
Junit5의 @Nested를 이용해 테스트 작성해보자
Junit5의 @Nested를 이용해 테스트 작성해보자
해당 테스트는 Java11 / Gradle / Junit 5.8.2버전을 이용해 작성되었습니다.
🧐 @Nested 알아보기
Java Doc
@Nested is used to signal that the annotated class is a nested, non-static test class (i.e., an inner class) that can share setup and state with an instance of its enclosing class.
The enclosing class may be a top-level test class or another @Nested test class, and nesting can be arbitrarily deep.
@Nested test classes may be ordered via @TestClassOrder or a global ClassOrderer.
Test Instance Lifecycle A @Nested test class can be configured with its own TestInstance.
Lifecycle mode which may differ from that of an enclosing test class.
A @Nested test class cannot change the TestInstance.Lifecycle mode of an enclosing test class.Since:
5.0See Also:
Test, TestInstance, TestClassOrder
@Nested 어노케이션이 있는 클래스를 둘러싸고 있는 클래스의 인스턴스와 설정 및 상태를 공유할 수 있는 중첩된 비정적(non-static) 테스트 클래스입니다. (ex) inner class)
둘러쌓는 클래스는 최상위 클래스일수도 있고 @Nested 테스트 클래스일수도 있으며, 중첩은 깊어질수 있습니다.
@TestClassOrder 또는 전역 ClassOrderer 를 이용해 순서를 지정할 수 있습니다.
@Nested 테스트 클래스는 둘러쌓는 테스트 클래스와 다를 수 있는 자체 TestInstnace.Lifecycle 모드를 구성할 수 있습니다.
해당 기능은 Junit5부터 나온 기능입니다.
Document
Denotes that the annotated class is a non-static nested test class.
@BeforeAlland@AfterAllmethods cannot be used directly in a@Nestedtest class unless the "per-class" test instance lifecycle is used. Such annotations are not inherited.
비정적(non-static) 중첩된 테스트 클래스를 의미합니다. @BeforeAll , @AfterAll 이 사용이 불가하며, 자체적으로 Test Instance LifeCycle을 가질수 있습니다. 해당 어노테이션은 상속이 되지 않습니다.
@Nested 테스트는 여러 테스트 그룹간의 관계를 표현할 수 있고 계층적으로 나타낼수 있습니다.
import static org.junit.jupiter.api.Assertions.assertEquals;
import static org.junit.jupiter.api.Assertions.assertFalse;
import static org.junit.jupiter.api.Assertions.assertThrows;
import static org.junit.jupiter.api.Assertions.assertTrue;
import java.util.EmptyStackException;
import java.util.Stack;
import org.junit.jupiter.api.BeforeEach;
import org.junit.jupiter.api.DisplayName;
import org.junit.jupiter.api.Nested;
import org.junit.jupiter.api.Test;
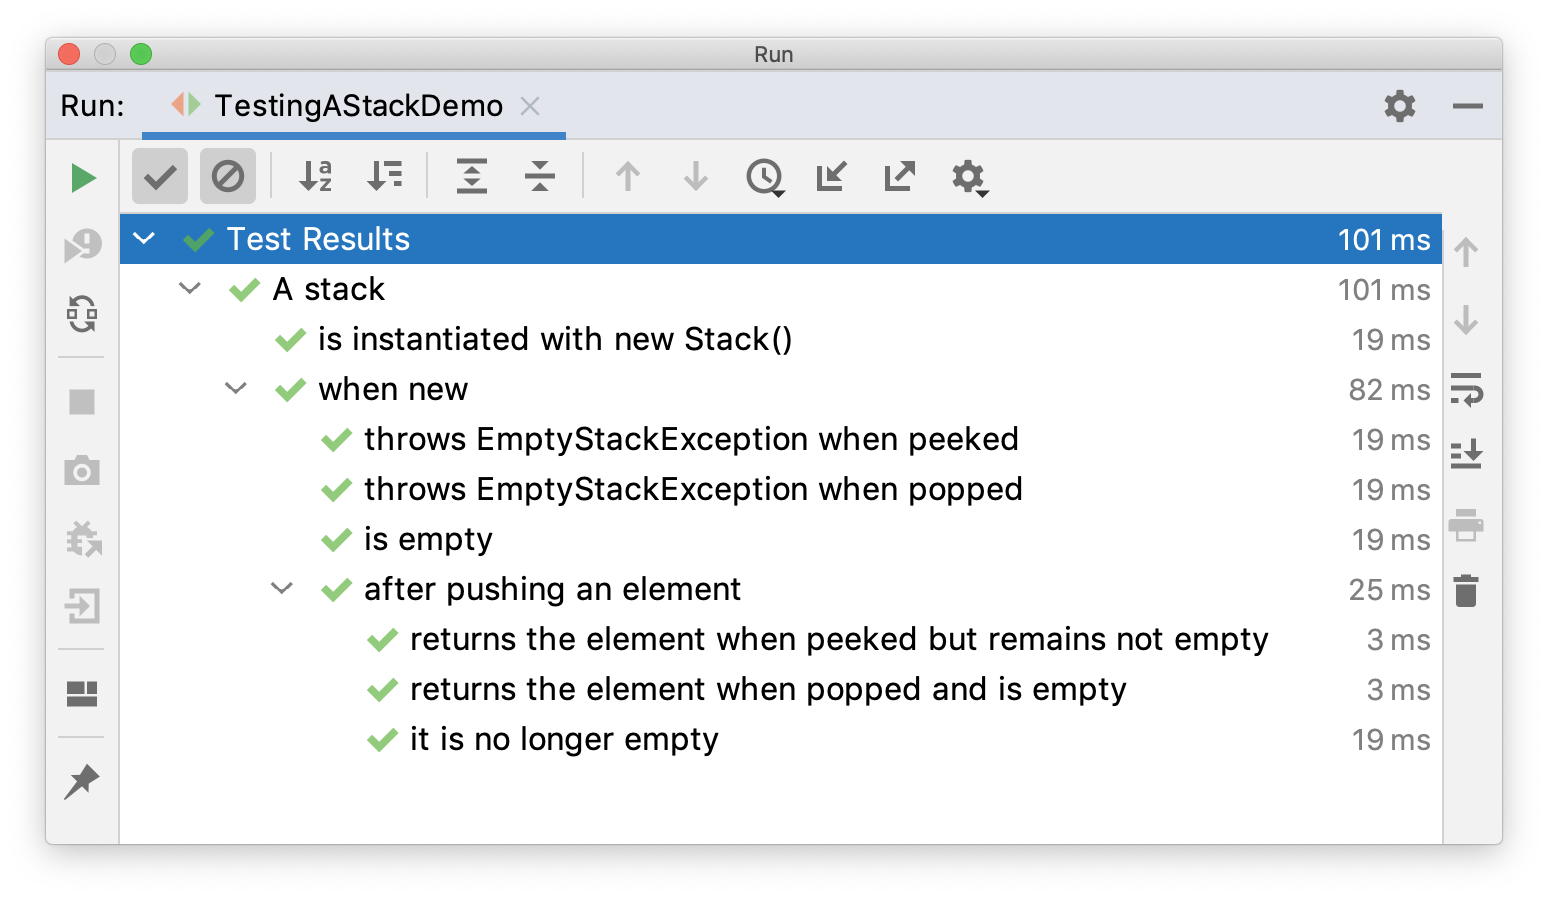
@DisplayName("A stack")
class TestingAStackDemo {
Stack<Object> stack;
@Test
@DisplayName("is instantiated with new Stack()")
void isInstantiatedWithNew() {
new Stack<>();
}
@Nested
@DisplayName("when new")
class WhenNew {
@BeforeEach
void createNewStack() {
stack = new Stack<>();
}
@Test
@DisplayName("is empty")
void isEmpty() {
assertTrue(stack.isEmpty());
}
@Test
@DisplayName("throws EmptyStackException when popped")
void throwsExceptionWhenPopped() {
assertThrows(EmptyStackException.class, stack::pop);
}
@Test
@DisplayName("throws EmptyStackException when peeked")
void throwsExceptionWhenPeeked() {
assertThrows(EmptyStackException.class, stack::peek);
}
@Nested
@DisplayName("after pushing an element")
class AfterPushing {
String anElement = "an element";
@BeforeEach
void pushAnElement() {
stack.push(anElement);
}
@Test
@DisplayName("it is no longer empty")
void isNotEmpty() {
assertFalse(stack.isEmpty());
}
@Test
@DisplayName("returns the element when popped and is empty")
void returnElementWhenPopped() {
assertEquals(anElement, stack.pop());
assertTrue(stack.isEmpty());
}
@Test
@DisplayName("returns the element when peeked but remains not empty")
void returnElementWhenPeeked() {
assertEquals(anElement, stack.peek());
assertFalse(stack.isEmpty());
}
}
}
}
정리
@Nested 어노테이션을 이용해 중첩 클래스를 이용해 계층적으로 테스트를 작성할 수 있습니다. 계층적으로 테스트를 작성하게 되면 테스트 그룹화가 쉬워지고, 테스트를 이해하는데 편리하다고 생각합니다.
🧐 @TestInstance(Lifecycle.XXX) 는 무엇인가?
@Nested 를 포면서 계속해서 나온 개념으로 하나씩 알아보도록 합시다.
@TestInstace
@TestInstance is a type-level annotation that is used to configure the lifecycle of test instances for the annotated test class or test interface.
If @TestInstance is not explicitly declared on a test class or on a test interface implemented by a test class, the lifecycle mode will implicitly default to PER_METHOD. Note, however, that an explicit lifecycle mode is inherited within a test class hierarchy. In addition, the default lifecycle mode may be overridden via the junit.jupiter.testinstance.lifecycle.default configuration parameter which can be supplied via the Launcher API, build tools (e.g., Gradle and Maven), a JVM system property, or the JUnit Platform configuration file (i.e., a file named junit-platform.properties in the root of the class path). Consult the User Guide for further information.Use Cases
Setting the test instance lifecycle mode to PER_CLASS enables the following features.
- Shared test instance state between test methods in a given test class as well as between non-static @BeforeAll and @AfterAll methods in the test class.
- Declaration of @BeforeAll and @AfterAll methods in @Nested test classes.
- Declaration of @BeforeAll and @AfterAll on interface default methods.
- Simplified declaration of @BeforeAll and @AfterAll methods in test classes implemented with the Kotlin programming language.
@TestInstance may also be used as a meta-annotation in order to create a custom composed annotation that inherits the semantics of @TestInstance.
@TestInstance 어노테이션은 테스트 클래스 또는 테스트 인터페이스에 대한 테스트 인스턴스의 수명 주기를 구성하는데 사용합니다. default값으로는 PER_METHOD로 설정이 되며, 모든 중첩 테스트 클래스내에 성속이 됩니다. 주명 주기 모드를 PER_CLASS로 설정하면 테스트 클래스의 비정적(non-static)의 @BeforeAll 및 @AfterAll 를 사용할 수 있고 테스트 클래스의 테스트 메서드 간에 테스트 인스턴스 상태를 공유하게 됩니다.
테스트 인스턴스의 LifeCycle Mode를 PER_CLASS로 설정하면 아래와 같은 기능이 활성화 됩니다.
- 테스트 클래스의
@BeforeAll, @AfterAll메서드 뿐만 아니라 테스트 클래스의 테스트 메서드 간에 인스턴스 상태를 공유합니다. @Nested클래스에서@BeforeAll,@AfterAll을 사용가능하게 됩니다.
LifeCycle이란?
enum Lifecycle {

        /**
         * When using this mode, a new test instance will be created once per test class.
         *
         * @see #PER_METHOD
         */
        PER_CLASS,

        /**
         * When using this mode, a new test instance will be created for each test method,
         * test factory method, or test template method.
         *
         * <p>This mode is analogous to the behavior found in JUnit versions 1 through 4.
         *
         * @see #PER_CLASS
         */
        PER_METHOD;

}- PER_CLASS : 이 모드를 사용할 때 새 테스트 인스턴스는 테스트 클래스당 한 번 생성됩니다.
- PER_METHOD : 이 모드를 사용하면 테스트 메서드에 대해 새 테스트 인스턴스가 생성됩니다.
⌨️ @Nested 를 이용해 테스트를 작성해보자.
간단한 프로그램으로 사칙연산을 하는 Enum을 구현해보고, 각 메서드 별로 중첩을 진행해보자.
아래는 간단하게 테스트 해볼 프로덕션 코드이다.
package mission.calculator.operator;

import java.util.Arrays;
import java.util.function.DoubleBinaryOperator;

public enum Operator {
    PLUS("+", Double::sum),
    MINUS("-", (number1, number2) -> number1 - number2),
    MULTIPLE("*", (number1, number2) -> number1 * number2),
    DIVISION("/", (number1, number2) -> number1 / number2);

    private final String symbol;
    private final DoubleBinaryOperator calculator;

    Operator(String symbol, DoubleBinaryOperator calculator) {
        this.symbol = symbol;
        this.calculator = calculator;
    }

    public static Operator of(String symbol) {
        return Arrays.stream(Operator.values())
                .filter(operator -> operator.symbol.equals(symbol))
                .findFirst()
                .orElseThrow(() -> new IllegalArgumentException("해당 연산자를 찾을 수 없습니다. : " + symbol));
    }

    public double calculate(double number1, double number2) {
        return calculator.applyAsDouble(number1, number2);
    }
}
간단하게 심볼을 이용해 Operator를 찾는 of 메서드와 사칙연산을 실제 실행하는 calculate 메서드를 테스트 해보도록 하겠습니다.
테스트 코드
package mission.calculator.operator;

import org.junit.jupiter.api.DisplayName;
import org.junit.jupiter.api.Nested;
import org.junit.jupiter.api.Test;
import org.junit.jupiter.api.TestInstance;
import org.junit.jupiter.api.TestInstance.Lifecycle;
import org.junit.jupiter.params.ParameterizedTest;
import org.junit.jupiter.params.provider.Arguments;
import org.junit.jupiter.params.provider.MethodSource;
import org.junit.jupiter.params.provider.ValueSource;

import java.util.stream.Stream;

import static org.assertj.core.api.Assertions.assertThat;
import static org.assertj.core.api.Assertions.assertThatThrownBy;

class OperatorTest {

    @Nested
    @DisplayName("symbol을 이용해 Operator를 찾는 of 메서드")
    class OfTest {
        @TestInstance(Lifecycle.PER_CLASS)
        @Nested
        @DisplayName("올바른 symbol이 들어오면")
        class UprightSymbolTest {
            @ParameterizedTest(name = "{0}의 값이 들어오면 {1}값을 반환한다.")
            @DisplayName("올바른 symbol이 들어오면 해당 Operator를 반환한다.")
            @MethodSource("provideSymbolsOfOperator")
            void uprightSymbolOfTest(String symbol, Operator operator) {
                assertThat(Operator.of(symbol)).isEqualTo(operator);
            }

            private Stream<Arguments> provideSymbolsOfOperator() {
                return Stream.of(
                        Arguments.of("+", Operator.PLUS),
                        Arguments.of("-", Operator.MINUS),
                        Arguments.of("*", Operator.MULTIPLE),
                        Arguments.of("/", Operator.DIVISION)
                );
            }
        }

        @Nested
        @DisplayName("잘못된 symbol이 들어오면")
        class WrongSymbolTest {
            @ParameterizedTest(name = "{0}의 값이 들어오면 에러를 반환한다.")
            @DisplayName("잘못된 symbol이 들어오면 에러를 반환한다.")
            @ValueSource(strings = {"", " ", "^", "&"})
            void wrongSymbolOfTest(String symbol) {
                assertThatThrownBy(() -> Operator.of(symbol)).isInstanceOf(IllegalArgumentException.class)
                        .hasMessageContaining("해당 연산자를 찾을 수 없습니다. : ");
            }
        }
    }

    @Nested
    @DisplayName("숫자 2개가 들어오면 계산하는 Calculate 메서드")
    class CalculateTest {

        @Nested
        @DisplayName("덧셈 테스트")
        class PlusTest {
            @Test
            @DisplayName("두개의 숫자가 들어오면 값을 더해서 반환한다.")
            void plusTest() {
                int number1 = 3;
                int number2 = 5;
                Operator operator = Operator.PLUS;

                assertThat(operator.calculate(number1, number2)).isEqualTo(8);
            }
        }

        @Nested
        @DisplayName("뺄셈 테스트")
        class MinusTest {
            @Test
            @DisplayName("두개의 숫자가 들어오면 값을 빼서 반환한다.")
            void minusTest() {
                int number1 = 10;
                int number2 = 5;
                Operator operator = Operator.MINUS;

                assertThat(operator.calculate(number1, number2)).isEqualTo(5);
            }

            @Test
            @DisplayName("결과가 음수인 경우에도 두개의 숫자가 들어오면 값을 빼서 반환한다.")
            void minusResultOfNegativeTest() {
                int number1 = 5;
                int number2 = 10;
                Operator operator = Operator.MINUS;

                assertThat(operator.calculate(number1, number2)).isEqualTo(-5);
            }
        }

        @Nested
        @DisplayName("곱하기 테스트")
        class MultipleTest {
            @Test
            @DisplayName("두개의 숫자가 들어오면 값을 곱해서 반환한다.")
            void multipleTest() {
                int number1 = 3;
                int number2 = 5;
                Operator operator = Operator.MULTIPLE;

                assertThat(operator.calculate(number1, number2)).isEqualTo(15);
            }
        }

        @Nested
        @DisplayName("나누기 테스트")
        class DivisionTest {
            @Test
            @DisplayName("두개의 숫자가 들어오면 값을 나눠서 반환한다.")
            void divisionTest() {
                int number1 = 10;
                int number2 = 2;
                Operator operator = Operator.DIVISION;

                assertThat(operator.calculate(number1, number2)).isEqualTo(5);
            }
        }
    }
}
📝 사용 후기
RubyOnRails의 RSpec이나, JavaScript의 Jest에서는 BDD 스타일로 중첩을 많이 이용했었는데, Junit을 이용해서는 중첩 방식을 처음으로 사용해봤습니다.
확실히 보일러 플레이트가 많은 자바이기 때문에 코드가 썩 깔끔해 보이지 않는 다는게 단점이라고 생각이 들긴 합니다.
그래도 결과를 보고 나중에 테스트 코드를 깨지는 부분을 유지보수 하는 시점에서는 어떤 테스트가 문제인지 테스트 결과만 보고 쉽게 알 수 있다는 장점이 있다고 생각이 듭니다.
그렇지만 중첩이 많아지면 테스트 코드 자체의 코드가 더러워지기 때문에 중첩의 깊이를 많이 두는 것은 별로라고 생각이 듭니다.