Backend/Spring
spring Rest Docs 정적 파일 만들기
Seyun(Marco)
2020. 9. 3. 13:05
728x90
Spring Rest Docs 정적 파일 만들기
Spring Rest Docs란?
- RESTful 서비스를 문서화 할 수 있게 도와주는 도구입니다.
- 기본적으로 Asciidoc을 사용해 작성된 코드에 의해 html파일을 생성해준다.(markdown도 가능하지만 제한이 있음.)
- Test로 자동 생성된 스니펫과 자신이 원하는 문서를 결합해서 사용할 수 있습니다. 따라서 Test가 통과되어야 문서가 작성된다는 장점이 있습니다.
- 이번 글은 Spring Rest Docs를 어떻게 사용하는지가 아닌, 정적 파일을 생성하여 빌드 후에 문서를 볼수 있게 하는게 주제이니, 자세히는 설명하지 않겠습니다.
Build Gradle 설정
plugins {
    id 'org.springframework.boot' version '2.3.3.RELEASE'
    id 'io.spring.dependency-management' version '1.0.10.RELEASE'
    id 'org.asciidoctor.convert' version '1.5.8' // asciidoc -> html 변환기
    id 'java'
}

group = 'spring.docs'
version = '0.0.1-SNAPSHOT'
sourceCompatibility = '1.8'

repositories {
    mavenCentral()
}

ext {
    set('snippetsDir', file("build/generated-snippets"))
}

dependencies {
    implementation 'org.springframework.boot:spring-boot-starter-web'

    compileOnly 'org.projectlombok:lombok'
    annotationProcessor 'org.projectlombok:lombok'
    testImplementation('org.springframework.boot:spring-boot-starter-test') {
        exclude group: 'org.junit.vintage', module: 'junit-vintage-engine'
    }
    testImplementation 'org.springframework.restdocs:spring-restdocs-mockmvc'
}

test {
    useJUnitPlatform()
    outputs.dir snippetsDir
}

asciidoctor {
    dependsOn test
    inputs.dir snippetsDir
}

bootJar {
    dependsOn asciidoctor
    // 실제 배포 시, BOOT-INF/classes가 classpath가 되기 때문에 아래와 같이 파일을 복사해야 합니다.
    from("${asciidoctor.outputDir}/html5") {
        into "BOOT-INF/classes/static/docs"
    }
}

task copyDocument(type: Copy) {
    dependsOn asciidoctor
        // 소스 코드에 html파일을 복사
    from file("build/asciidoc/html5")
    into file("src/main/resources/static/docs")
}

build {
    dependsOn copyDocument
}- asciidoctor & bootJar & copyDocument & build를 설정해줘야 합니다.
Controller 생성
- 테스트 코드를 작성하기 위해 DTO와 Controller를 간단하게 만듭니다.(여기서는 실제 로직이 중요한게 아니기 때문에 Service 등은 만들지 않습니다.)
import lombok.Getter;
import lombok.RequiredArgsConstructor;

@Getter
@RequiredArgsConstructor
public class BookCreateRequest {
    private final String title;

    private final String author;

    private final Integer price;
}
import lombok.Getter;
import lombok.RequiredArgsConstructor;
@RequiredArgsConstructor
@Getter
public class BookCreateResponse {
private final String title;
private final String author;
private final Integer price;
}import org.springframework.http.HttpStatus;
import org.springframework.http.ResponseEntity;
import org.springframework.web.bind.annotation.PostMapping;
import org.springframework.web.bind.annotation.RequestBody;
import org.springframework.web.bind.annotation.RestController;
import spring.docs.ex.dto.BookCreateRequest;
import spring.docs.ex.dto.BookCreateResponse;
@RestController
public class BookController {
@PostMapping("/books")
public static ResponseEntity<BookCreateResponse> createBook(
@RequestBody final BookCreateRequest bookCreateRequest) {
final BookCreateResponse bookCreateResponse = new BookCreateResponse(
bookCreateRequest.getTitle(),
bookCreateRequest.getAuthor(),
bookCreateRequest.getPrice()
);
return ResponseEntity.status(HttpStatus.CREATED)
.body(bookCreateResponse);
}
}- 간단하게 book에 대한 정보를 입력하면 입력된 정보가 다시 반환하는 Controller를 만들었습니다.
테스트 코드
import static org.springframework.restdocs.mockmvc.MockMvcRestDocumentation.*;
import static org.springframework.restdocs.mockmvc.RestDocumentationRequestBuilders.*;
import static org.springframework.test.web.servlet.result.MockMvcResultHandlers.*;
import static org.springframework.test.web.servlet.result.MockMvcResultMatchers.*;

import org.junit.jupiter.api.BeforeEach;
import org.junit.jupiter.api.Test;
import org.junit.jupiter.api.extension.ExtendWith;
import org.springframework.boot.test.context.SpringBootTest;
import org.springframework.http.MediaType;
import org.springframework.restdocs.RestDocumentationContextProvider;
import org.springframework.restdocs.RestDocumentationExtension;
import org.springframework.test.web.servlet.MockMvc;
import org.springframework.test.web.servlet.setup.MockMvcBuilders;
import org.springframework.web.context.WebApplicationContext;

import spring.docs.ex.controller.docs.BookDocumentation;

@ExtendWith(RestDocumentationExtension.class)
@SpringBootTest
class BookControllerTest {

    private MockMvc mockMvc;

    @BeforeEach
    void setUp(final WebApplicationContext webApplicationContext,
            final RestDocumentationContextProvider restDocumentationContextProvider) {

        this.mockMvc = MockMvcBuilders.webAppContextSetup(webApplicationContext)
                .apply(documentationConfiguration(restDocumentationContextProvider))
                .build();
    }

    @Test
    public void createByJsonParams() throws Exception {
        final String jsonParams = "{ \"title\": \"test\",\"author\": \"test\", \"price\": \"1000\"}";
        mockMvc.perform(post("/books")
                .content(jsonParams)
                .accept(MediaType.APPLICATION_JSON)
                .contentType(MediaType.APPLICATION_JSON))
                .andDo(print())
                .andExpect(status().isCreated())
                .andDo(BookDocumentation.createBook())
        ;
    }
}
import static org.springframework.restdocs.mockmvc.MockMvcRestDocumentation.*;
import static org.springframework.restdocs.payload.PayloadDocumentation.*;
import org.springframework.restdocs.mockmvc.RestDocumentationResultHandler;
public class BookDocumentation {
public static RestDocumentationResultHandler createBook() {
return document("books/create",
requestFields(
fieldWithPath("title").description("책 제목"),
fieldWithPath("author").description("책 저자"),
fieldWithPath("price").description("책 가")
),
responseFields(
fieldWithPath("title").description("책 제목"),
fieldWithPath("author").description("책 저자"),
fieldWithPath("price").description("책 가")
)
);
}
}- 이 글에서 중요한 내용은 html을 서버가 구동하고 있을 때 문서를 확인할 수 있도록 정적 파일에 넣은 것이므로 코드에 대한 설명을 넘어가겠습니다.
asciidoc 작성
- api-guide.adoc
ifndef::snippets[]
:snippets: ../../../build/generated-snippets
endif::[]
:doctype: book
:icons: font
:source-highlighter: highlightjs
:toc: left
:toclevels: 2
:sectlinks:
:operation-http-request-title: Example Request
:operation-http-response-title: Example Response

[[resources]]
= Resources

[[resources-book]]
== Book

[[resources-book-create]]
=== 정보 가져 오기

include::{snippets}/books/create/http-request.adoc[]
include::{snippets}/books/create/http-response.adoc[]
include::{snippets}/books/create/response-fields.adoc[]- 위의 해당 파일은 아래의 사진에서 보듯이 maven과 gradle 일때마다 위치가 지정되어 있습니다. 이 위치가 아닌 다른 위치에 준다면 문서를 만들다가 에러를 발생시킵니다. 꼭 위치를 올바르게 해주세요.

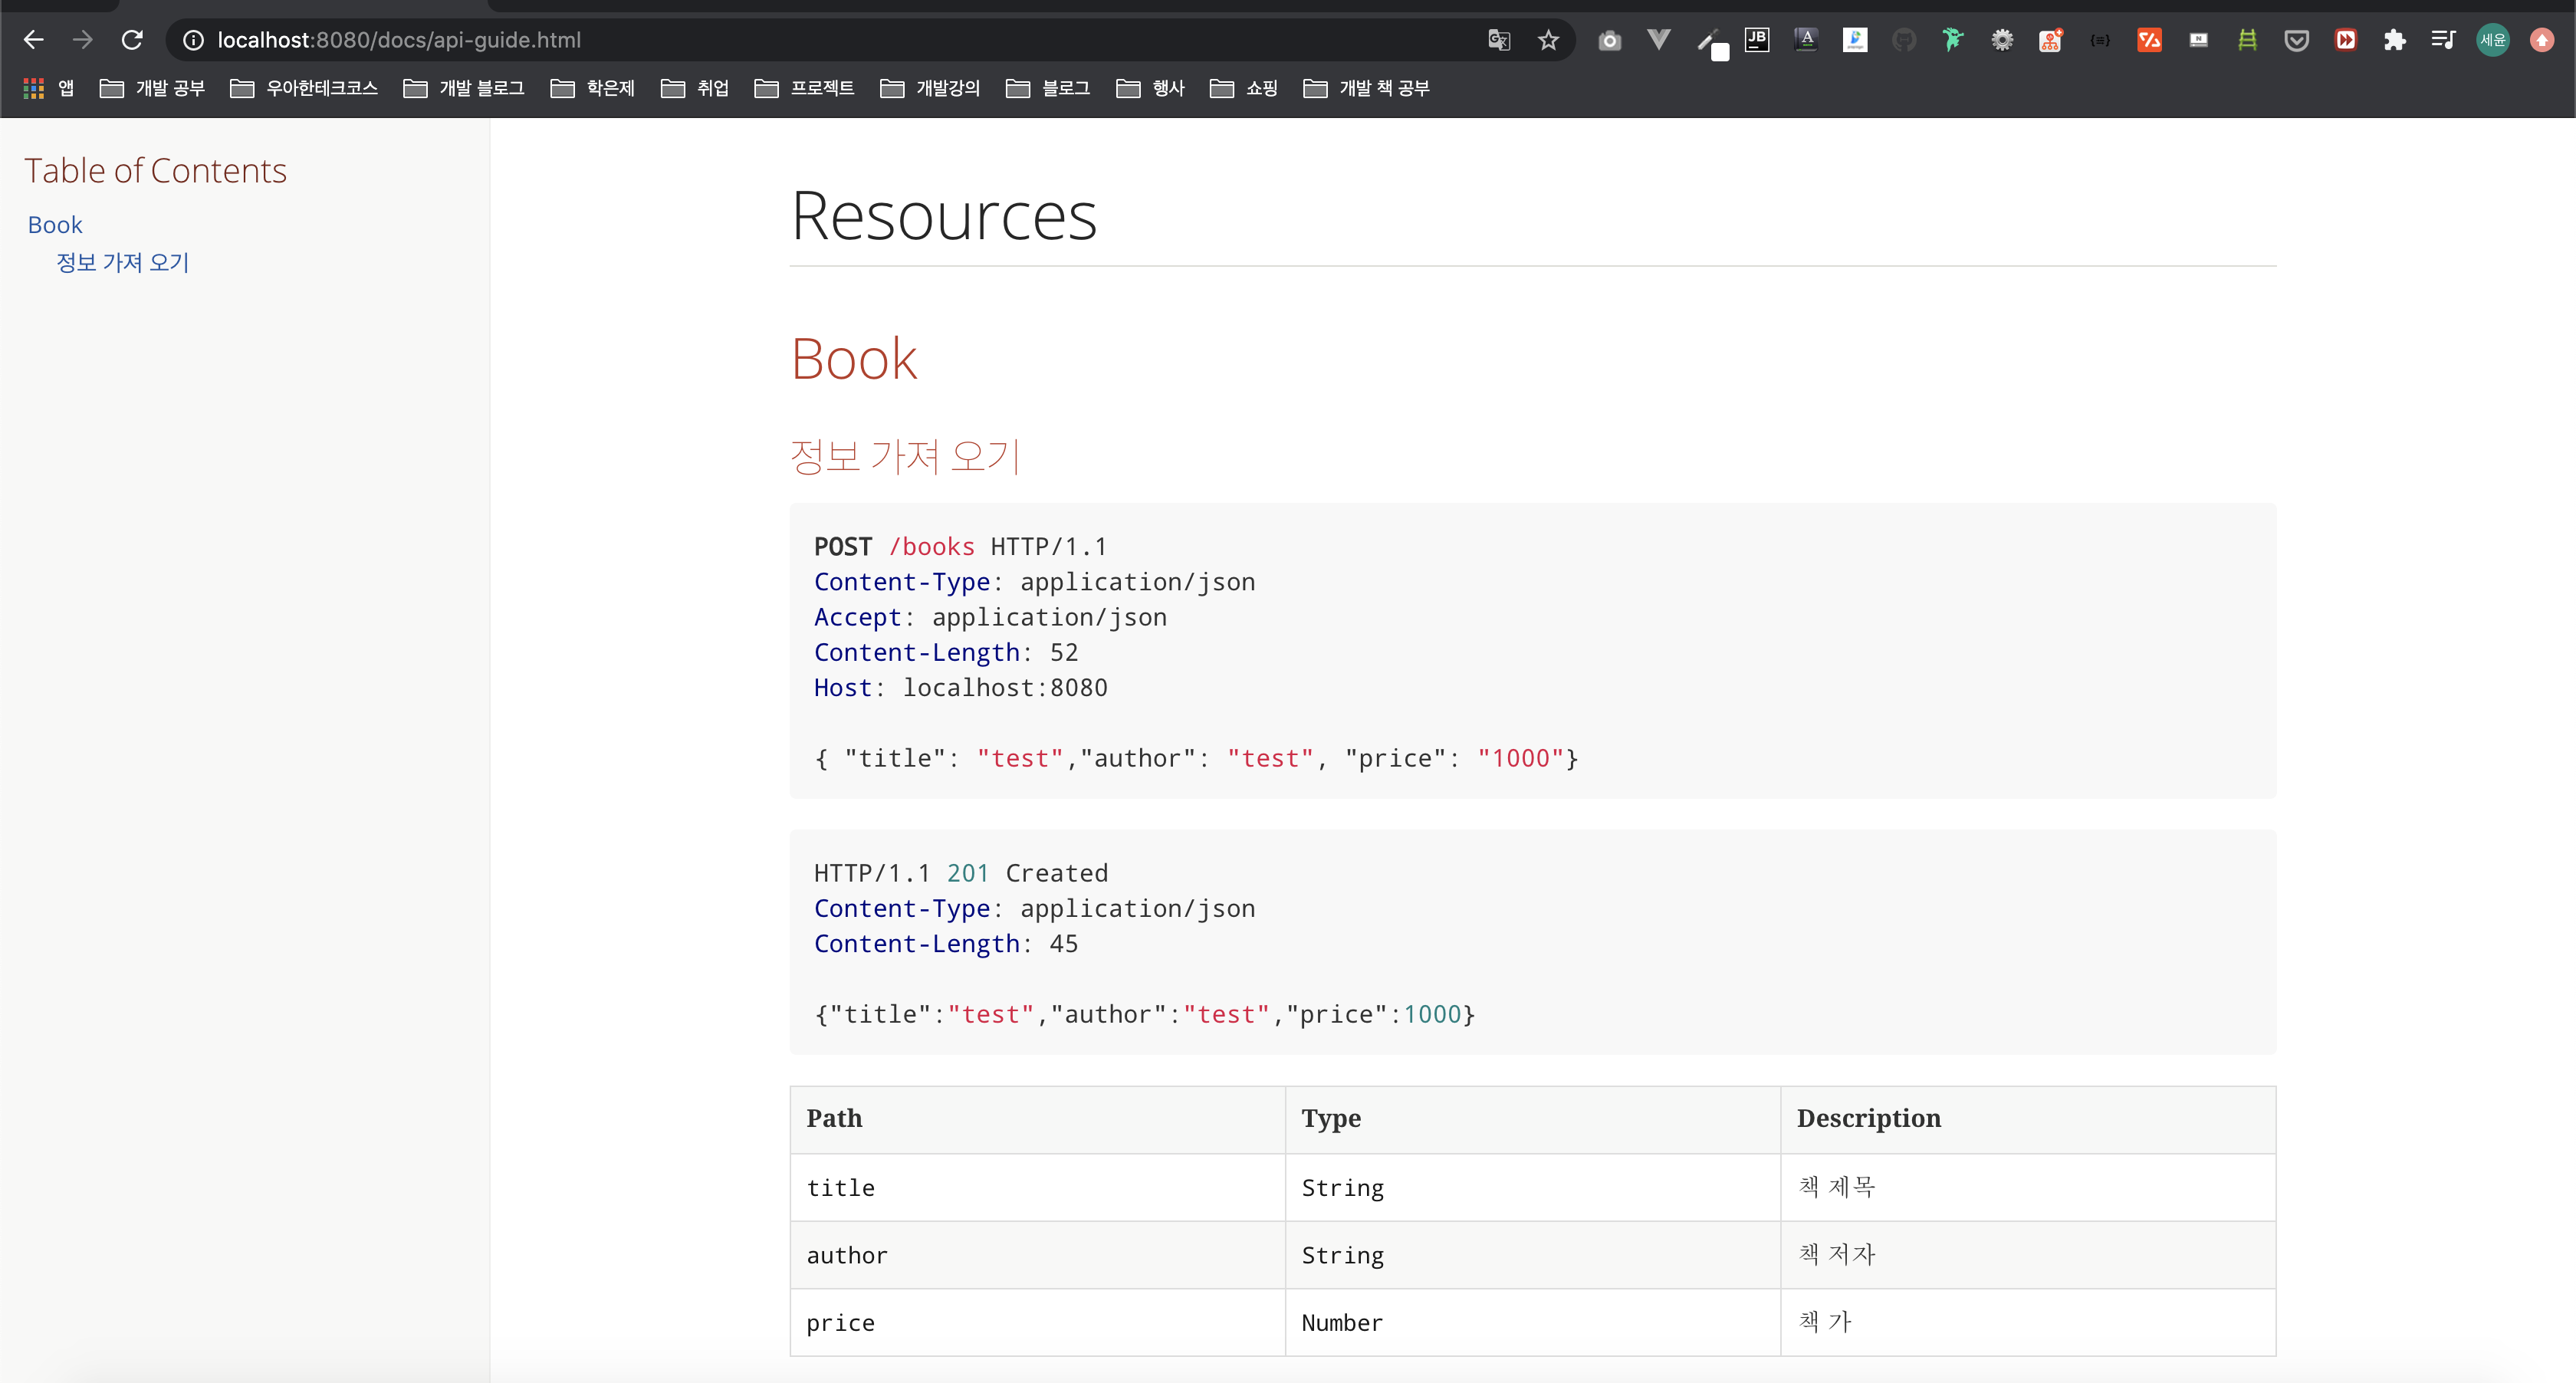
docs 확인
- 위와 같이 모든 코드를 작성하고 실행을 해보면
/docs/api-guide.html을 경로로 지정하면 문서를 확인할 수 있습니다.

참고자료
[Spring Rest Docs를 이용한 API 문서 만들기 | Carrey`s 기술블로그](https://jaehun2841.github.io/2019/08/04/2019-08-04-spring-rest-docs/#asciidoctor-plugin-%EC%84%A4%EC%A0%95)
728x90
728x90
